I spent a lovely evening at the Mint Hill Arts listening to a lecture given by Nancy Cook. What she does with fabric, ink and quilting is truly art. She was so open and forthcoming about how she makes her art. She reminded me how much I really do like to paint. I'm still a fill-in-the-numbers kind of girl. I came across a fun little piece that I made. I used a design from Anita Goodesign and then painted with acrylic paints. There was a lot of trial and error, but I was pleased with the way it came out. After seeing Nancy's work, I see where I could have used quilting to suggest flow and motion and maybe made it look a little more artistic. It you get a chance to visit her website, I think you'll find it worth your time to see her pieces. I can honestly say that the photography doesn't do it justice. There is so much detail that it's phenomenal. http://www.nancygcook.com
Thursday, January 27, 2011
Acrylic Painting
I spent a lovely evening at the Mint Hill Arts listening to a lecture given by Nancy Cook. What she does with fabric, ink and quilting is truly art. She was so open and forthcoming about how she makes her art. She reminded me how much I really do like to paint. I'm still a fill-in-the-numbers kind of girl. I came across a fun little piece that I made. I used a design from Anita Goodesign and then painted with acrylic paints. There was a lot of trial and error, but I was pleased with the way it came out. After seeing Nancy's work, I see where I could have used quilting to suggest flow and motion and maybe made it look a little more artistic. It you get a chance to visit her website, I think you'll find it worth your time to see her pieces. I can honestly say that the photography doesn't do it justice. There is so much detail that it's phenomenal. http://www.nancygcook.com

Tuesday, January 25, 2011
Beginning Sewing
The first Beginning Sewing class of the year went well today. Most of my students are new to sewing and I always love being able to introduce them to sewing and their machine. The biggest learning curves are usually the machine and sewing terms. Our projects will be a pillowcase, pajama bottoms and tote bag from the book titled, Sew Easy Pajama Pants by Cindy Taylor Oates. The other book we're using is Nancy Zieman's Sew with Confidence. It's such a wonderful resource for sewing terms and tips. It will be a great companion for the new sewer.
Thursday, January 20, 2011
Pillow Toppers

It's that time of year again. The Beginning Sewing Classes are starting up and I'm always asked what comes next? So Creative Sewing has started offering an Advanced Sewing class to have buttonholes, applique, piping, zipper and a little sewing with clear thread. It's a fun class and some of my students have gone on to make quite a few pillow toppers. Once you have the pillow made you can button on the topper for the season/holiday/celebration that you want. So far we have 4 designs. Two for Spring and two for Fall classes.
Tuesday, January 18, 2011
It's That Time of Year Again!

First Communion is right around the corner! It is so much fun to make the veils for the girls. I always participate in a show at St. Matthews in December with my veils and christening gowns to hand out my cards. I made bridal veils, accessories and christening gowns for over 1o years and then moved to NC. I took a break and volunteered a lot with the kids schools and activities. In the past couple of years I've been creating again and found that I really missed it and am glad to have started back. I actually am thinking about teaching how to make Christening gowns and veils, but time will tell.
Sunday, January 16, 2011
Free Motion Quilting
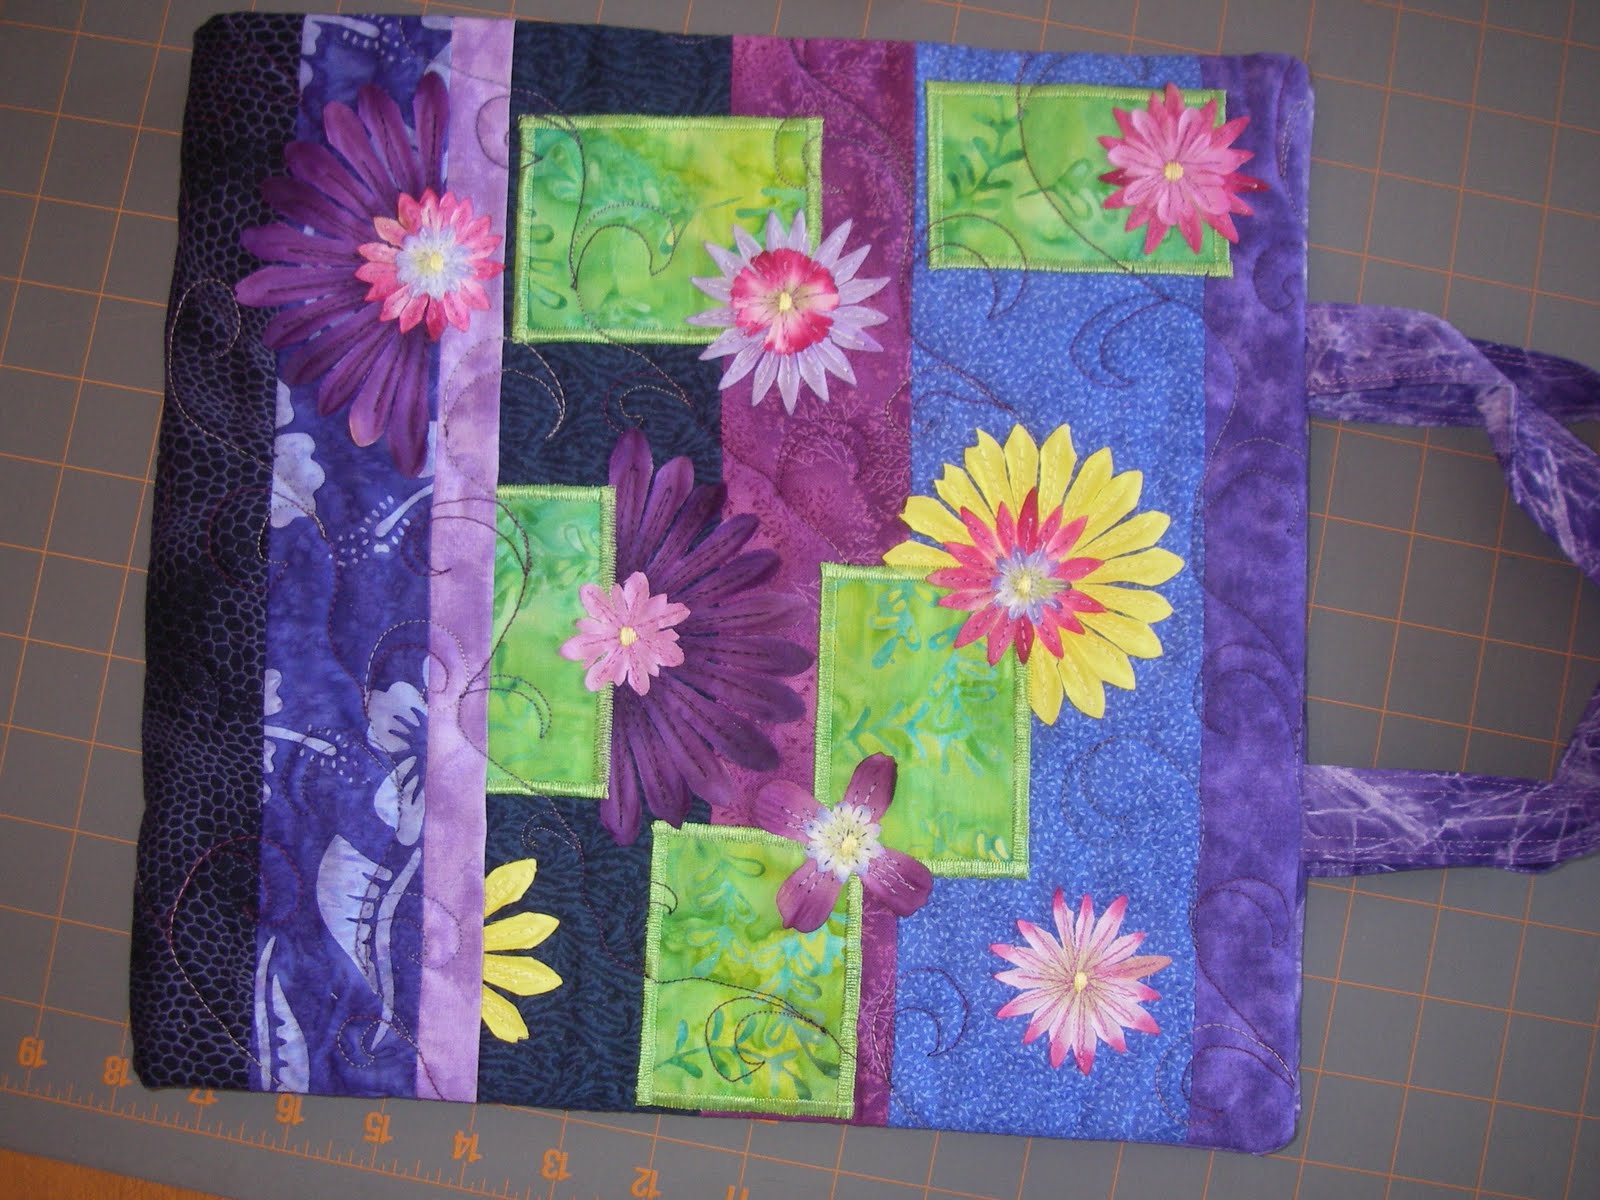 After posting the embroidery club, I realized that I had another project that I did free motion quilting on! I use this 3 ring binder all the time for classes. All my notes and handouts are in it for the sessions I teach and I'm always surprised when somone remarks on it. Because I use it all the time, sometimes I forgot how striking it is. I used leftover fabric from a quilt that I made with purples, blues and lime green. I found the lime green at Quilt Patch fabrics and went through my stash for the rest. I've enjoyed working with the silk flowers also. They've stood up really well to being carried around with all of my other supplies.
Friday, January 14, 2011
Embroidery Club is here again!


Embroidery Club starts at Creative Sewing next month and two of the samples are done and in the shop. Here's a quick peek. February is going to offer The Patchfolio for an 8x11 pad with room on the left for papers, pens and a business card. It's a wonderful gift or place to keep papers from class and notes. I will also be offering directions for an ebook holder as an extra or alternative project. I just received a kindle for my birthday last year and love it! I honestly didn't know if I'd miss my 'real' books, but I have to admit that I like the size and weight of the kindle. It will make traveling soooo much easier this year. Last year for vacation I took a BUNCH of books and was stuck at O'Hare airport rearranging my luggage so that I wasn't over and had to pay extra. I ended up loading up my backpack and carrying extra thru the airport. Not fun at all. April will bring the Quilted Laptop Case. This was a wonderful project to practice free motion quilting. It's small enough that shouldn't prove too frustrating and I sure need the practice. I usually quilt with my mother's long arm. Moving the fabric instead of the machine proves to be very different. I will definitely need more practice. I honestly think this bag could be used for anything. I'm off to finish that last project, which will be a cutwork pillow. I found the cording for it today and will sew it up tomorrow.
Happy Stitching
Tuesday, January 11, 2011
Bridal Dresses Reinvented!


Saturday, January 8, 2011
The Month of the Lists!

Silly me! I thought that January would slow down and maybe I could get caught up. I'm not sure if I should be happy that I'm busy or scared that I'm busy. LOL Oh well, I will start making lists and see how much sleep I'll be getting. The good news is that I have finished binding my Christmas quilt that I started many years ago. It was my second quilt class ever and I had a blast learning why a 1/4" seam allowance is soooo important. My friend Gene helped me pick out some of the fabrics from Mary Jo's in Gastonia, after I finished my blocks, we lost Gene and her husband to a drunk driver. It took me many years to get back to it, I wanted to be able to do a good job quilting it and needed time to work on my skills. I'm happy to say that it is truly finished and today I'm putting away all the left over fabric.
Today I'll continue working on samples for classes that I'm teaching and a few birthday cards and gifts for friends. My mom, Melody and myself with some of their friends are starting a 2011 Quilt Project Challenge to get some projects finished for this year! I'll be posting finished projects as I go.
Wednesday, January 5, 2011
Creative Ways to Store Fabric
This evening tied right into my New Year's Resolution. The Charlotte Quilt Guild had Lois Hallock in for a lecture about Creating your Perfect Quilt Space, which is also the title of her book. She spent a lot of time speaking about proper heights of your sewing/cutting and ironing surfaces and ways to adjust what you already have. She also shared tips to corral all the fabric that we have and ways to fold and store it. I've had her book for a couple of years and used some of the ideas, but now that I've been quilting for a while I have a lot more scraps than I did before. My sewing room wasn't set up for quilting when we moved here. My focus was more sewing clothing, bridal veils, christening gowns and embroidery. Quilting is another craft that can eat up a lot of space, but now hopefully I can view my rooms with new eyes. I'm using my 8 1/2" x 24" ruler to fold my 1/2 yard and up fabric, my top buffet drawer is gathering fat quarters by color and my decorator boxes that used to hold projects are my scraps sorted by color. The project boxes that Lois offered at the guild meeting are now being used to store my projects. I'll be moving around my supplies also. I've found that I need to group my cutting and pressing supplies in the dining room instead of the sewing room.
Thursday, December 30, 2010
2011 Quilt Project Challenge
A small group of friends have gotten together to bust our stashes! Quilt stashes that is! 2011 is going to be the year of more sewing and less shopping. Well....that's the premise of the challenge. I might even be able to see the floor of my sewing room by years end. I sew in the formal living room and cut/iron in the dining room. The end of this year saw my projects/supplies moving into the family room and then I knew I had to do something about all the projects! Between teaching embroidery and sewing classes and quilting for myself, I've acquired quite a stack of fabrics. So I guess this is the New Year's Resolution: Finish those projects and also have handmade gifts ready!
Tuesday, December 21, 2010
Christmas is almost here and the projects aren't going to be finished!
I think we always try to squeeze in more than time allows! I have so many ideas for Christmas and all the supplies stacked up. My husband is even making the cookies this year. I just think that those projects will have to go on the back burner and saved for 2011. So this is goodbye to pajama bottoms and a pillowcase for my son and a purse and makeup brush holder for my daughter. Hopefully to be resurrected next year. LOL!
Friday, December 17, 2010
Houston was a Blast!


This show is like a textile art museum of the finest quality workmanship across the globe. I took over 3oo pictures! Only a few had people in them. LOL! Sharon Schamber won the Handi Quilter Best of Show for her quilt titled Mystique. It was an astounding quilt done in 9 separate pieces and connected with looped piping. It is hard to see that the piping is see-thru, but it was definitely a work of art. One of the women showing the quilt said that it took 4 years to complete and I could surely believe it. The background was white with black stitching. It had a tiny herringbone pattern that was unbelievable. The Viewers Choice went to Hollis Chatelain from Hillsborough, NC for her quilt named Innocence. It was the most awe inspiring and moving quilt that I have ever seen. I went back at least 5 times and still felt that I could have looked at it all day. The portrait of the young boy was wonderful in itself, but when I walked closer, I realized that it was quilted with pictures of children from across the globe. Some on trikes, washing laundry, holding a machine gun. From the best to the worst our humanity has wrought. If you get a chance, go to www.quilts.org/winners.html to see all the winners. These were my top two that I will never forget, but there was so much to choose from.
Thursday, December 2, 2010
Ice Skate Stocking
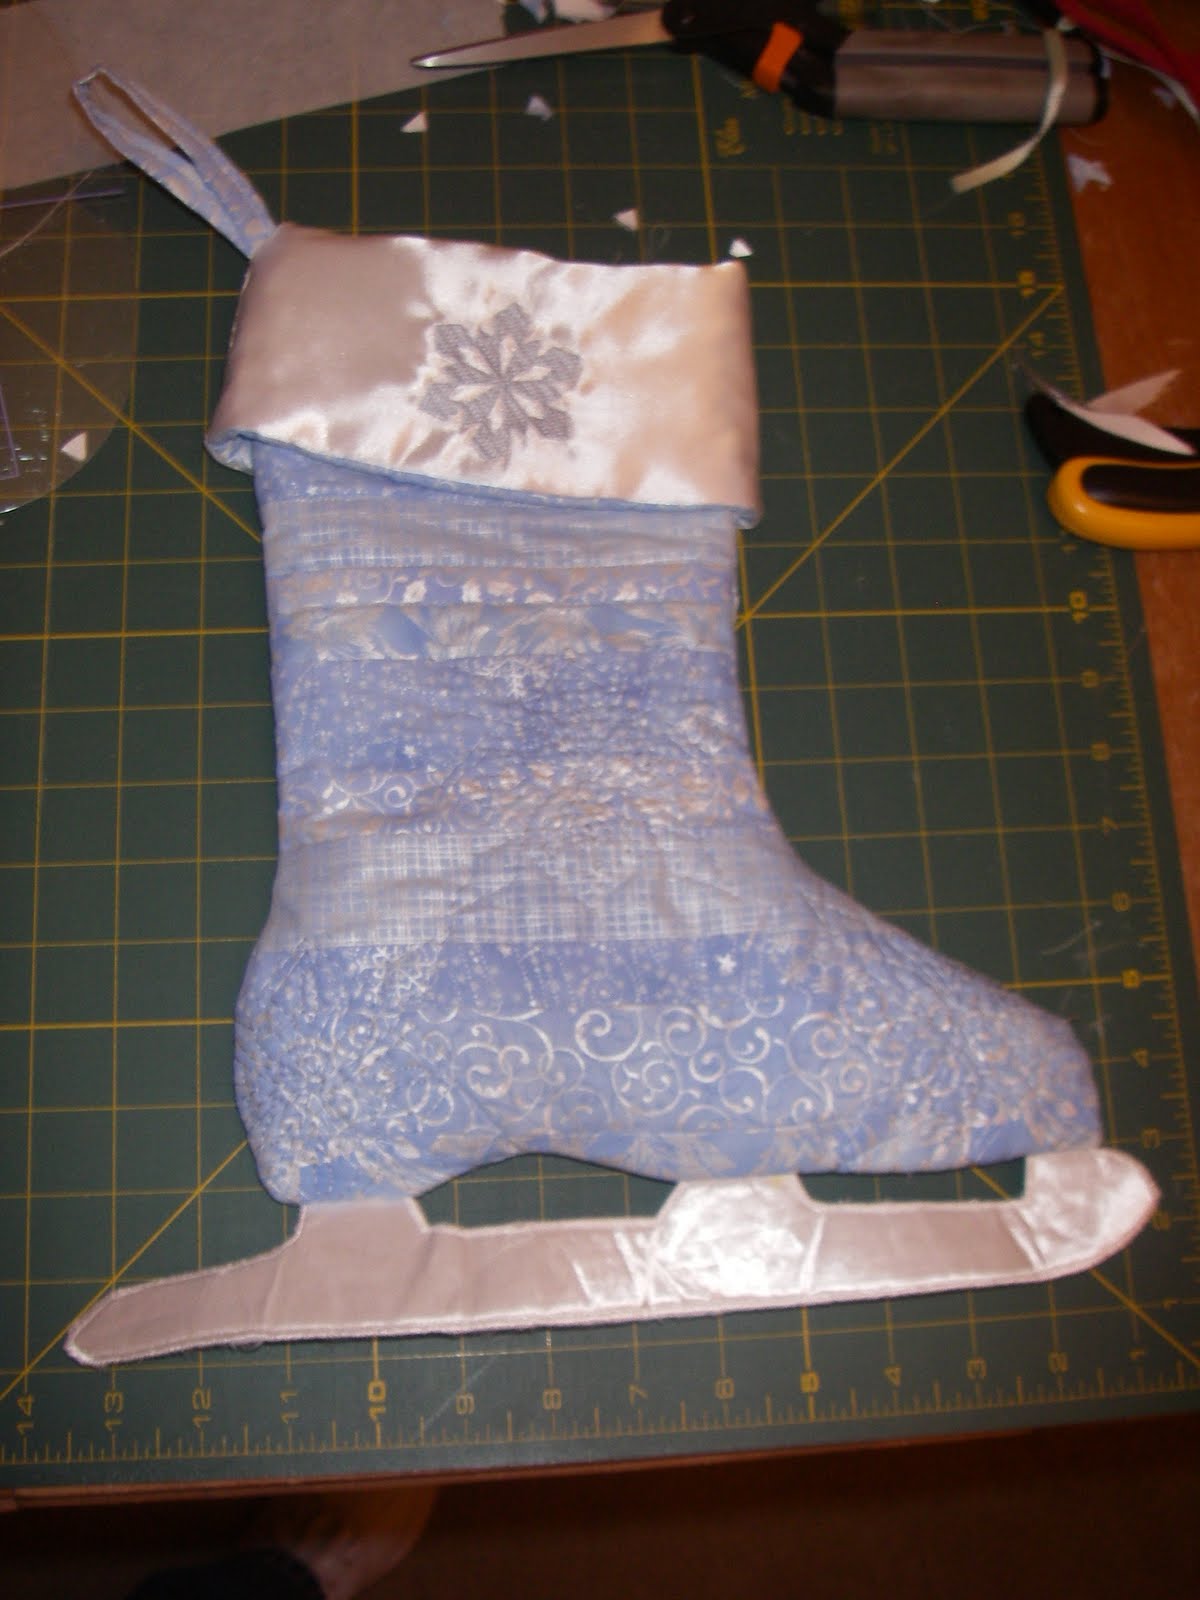
My stocking turned out much better than I envisioned. A little differently too. I wanted fur on the top and embroidered that but was unhappy with the look. I then embroidered on the satin and was very happy with the shine at the top. I took a pattern online that was made for felt and reworked it to use the cotton. The felt was used flat with raw edges, so this took a little time. This stocking was donated at the Charlotte Quilt Guild and took first prize. The prize was a pair of Gingher scissors! We stuffed the stockings with dollars for your favorite and then the money was used to fill the stockings for the USO. I was wonderful to see all the beautiful stockings hung there. I am new to the guild and need to remember to put my camera in my purse! The embroidery design is from www.ArtisticThreadworks.com and the pattern was from the Family Fun website. (You will definitely need to rework this pattern, but it was worth it)
Tuesday, November 30, 2010
It's Back!
 The Boondoggle is back! I'm so excited. Mom quilted my quilt and sent it back. So now I can show the border. It goes around three sides and I added just enough to cover the queen bed. I chose a King Tut variegated thread for the quilting. Mom struggled with it shredding and breaking, so I will probably go back to the other threads. The variegated was beautiful though and now I have to make some bias binding for the edges. This will probably be put up intill the new year. I have 4 quilts now that need binding and need to sew on the binding so that I can bring them to my stitching group to work on. I find that I enjoy handstitching the binding on when I'm with my group. I get more done and feel like I can do it without thinking too much about it. Thanks Mom!
Thursday, November 18, 2010
T-Shirt Dress

T-Shirt dresses are so fun and easy to make! I used to make them all the time for my daughter and nieces and decided to teach the No-Pattern skirt class with a few extra projects thrown in. This is basically a ruffle that is sewn to the bottom of the shirt. Measure the best place for the ruffle/skirt to start and cut straight across the bottom of the t-shirt. Gather your fabric as you would for a skirt and pin it to the bottom of the t-shirt. If you have a serger the next step is your last! Serge the skirt to the t-shirt. If you have a sewing machine, sew the skirt on and then zig zag the edges.
The diamond in the middle of the t-shirt is a idea I had from reverse applique. The matching fabric goes under the drawn design on the t-shirt. Sew the inside lines with a straight stitch and zig zag around the edges to finish the shape. Clip the center of each sections, making an X and after washing a couple of times the edges will curl up and show the underlying fabric.
Tuesday, November 9, 2010
Quick Gifts for the Holidays

A Tea Towel and Wine Bag are quick and easy gifts for the holidays. The designs are from OESD and the lettering is from my Brother 4000D. I always figure why pay for letters if you can use what you have in your machine! I think my Brother has quite a few options. I buy the letters that are unique and add something to the design or theme. These designs sewed out quickly. I also used the directions on you tube to finish the edge of the towel and top of wine bag. The directions were originally for pillowcases but I used them for these gifts and was very happy with the results. They look so finished inside that I wish I would have taken a photo of that too. Here is the link to the you tube video. http://www.youtube.com/watch?v=MrYWCma9wgM
Thursday, November 4, 2010
Fall Banner
Fall is my favorite time of year! I couldn't resist using it in a embroidered project. The designs are from Anita Goodesign and the fabric patches are from a church banner I made years ago. My friend Nadine offered the linen for the embroidery and away I went. I love coming up with my own layouts.
 are from Anita Goodesign and the fabric patches are from a church banner I made years ago. My friend Nadine offered the linen for the embroidery and away I went. I love coming up with my own layouts.
Thursday, September 30, 2010
Fall Candle Ring

WOW! It's been 3 months since my last post! I've been working on classes for the fall and am posting a photo of the Fall Candle Ring class. It is embroidered leaves with heirloom stitching on the cloth base. I had a great time coming up with the idea and it is a wonderful addition to the fall classes. I have to admit that I love the fall season and am especially looking forward to the cool weather.
Monday, September 13, 2010
The Quilt That Just Won't Quit
I finally finished the Boondoggle quilt top. It's traveled with me to WI twice and finally got to stay there. I've been working on the border and decided to do a variation of a grandmother's fan. I used all of the leftover fabric pieces that I was told to throw away and added 19 more wedges and the centers to make the circular border. I decided to just have the border on three sides, since this will be a bed quilt, and thought it might not be as comfortable for sleeping. I would love to show you a picture of this, but am unable too because it's STILL in WI. My mother and I loaded the quilt and then her machine started acting up. She has graciously offered to quilt it for me after she gets her machine fixed and I have to tell you, I was so relieved! I was going to take it home and put it away for awhile. I might have to call it my patience quilt! I will post a pic when I get it back.
Sunday, August 8, 2010
Northern Wisconsin


One of the classes I enjoy teaching very much is the Photo Quilt. My quilt is of Northern Wisconsin at the mouth of one lake from another. It's such a beautiful area and we enjoyed our stay there. It measures approx. 18"x24". My friend Diane took the picture to the right and we had a good time working with using a photo with a person instead of a landscape. It changed the areas that were cut and fabric added to it. I've always enjoyed Ricky Tims' convergence quilts and thought it would be lovely to try it with a picture printed on fabric. The big tip to this quilt it to ALWAYS print your photo first on fabric and then find the fabric for the strips. The fabric absorbs the ink and mutes it a little. My quilt was made with Printed Treasures fabric for an inkjet printer and batiks. I used cotton batting and the binding was made from both colors of batik. The free motion quilting was done with clear thread in a long curved line along the blue fabric to mimic the motion of the water.
Subscribe to:
Posts (Atom)